martes, 16 de septiembre de 2014

Conceptos Básicos 2: Velocidad de Obturación

Segunda entrada sobre las ideas básicas más importantes a tener en cuenta para iniciarse con la fotografía:
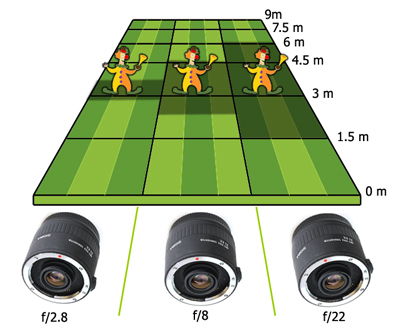
1. Apertura del Diafragma.
2. Velocidad de Obturación
3. ISO
4. Exposición/Sobrexposión/Subexposición
5. Distancia Focal


2. VELOCIDAD DE OBTURACIÓN

- La velocidad de obturación es el tiempo que dejamos el sensor expuesto a la luz. Podría decirse que, es el tiempo que dura el disparo. ¿No habéis configurado alguna vez vuestra cámara compacta para hacer una foto nocturna y habéis notado que tardaba más de lo normal en sacar la foto? Eso es porque para fotos nocturnas -con poca luz- la velocidad de obturación aumenta, tomando la foto incluso por varios segundos. (Y probablemente luego os resultara movida)


- Se mide en fracciones de segundo (1/1000) o segundos (3"). De esa manera, si queremos captar algo en momiento, deberemos "disparar" más rápido para evitar que el sujeto nos salga movido. La típica foto de un amigo saltando ¿os sale movida? Deberéis disminuir la velocidad de obturación para que la foto se saque más rápida. En ejemplo, pasamos de 1/30 de segundo a 1/320 de segundo.


https://open.abc.net.au/

- Afecta principalmente al tiempo que la luz alcanza el sensor, que influye en:

  • Exposición de la foto, la foto puede salir más clara o menos. Si las condiciones de luz son muy buenas, y dejamos el disparo suspendido por demasiado tiempo, el sensor recibirá demasiada luz y la foto quedará clara.

http://www.shortcourses.com/

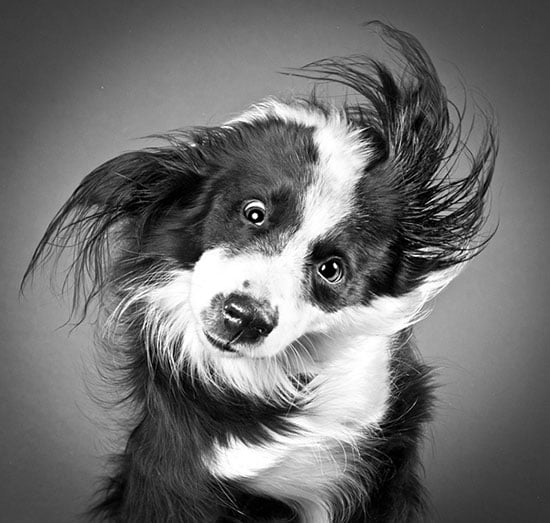
  • Efecto del movimiento de la imagen. Si queremos conseguir una imagen congelada, sin movimiento, utilizaremos disparos muy rápidos. Si de lo contrario, queremos agregar dinamismo o movimiento, deberemos jugar con velocidades de disparo más lentas.


http://andreachavarriadotcom.wordpress.com/


Ahora vamos a ver varios ejemplos,


http://www.hiboox.es/

http://www.luchotv.com/

http://www.digitalcameraworld.com/

El agua es un elemento muy utilizado para comprender el funcionamiento de la velocidad de obturación. Podemos decidir entre congelar las gotas de agua, pasando por agregarle movimiento o convertir la caída del agua en un efecto seda.

El Efecto Seda se consigue aumentando el tiempo de disparo, de esa manera captamos el movimiento del agua en la foto -lo contrario a congerlarla-. Ejemplos de Efecto Seda en el agua:

http://rincondelfotografo.blogspot.de/


Recomendaciones para el uso de la velocidad de obturación:

+ Si estamos fotografiando un sujeto en movimiento, un futbolista, un ciclista, un vehículo, un animal, un salto, etc...  debemos jugar con obturaciones más rápidas, que nos permitan enfocar o congelar -en la medida que deseemos- a nuestro sujeto u objeto.

http://petapixel.com/

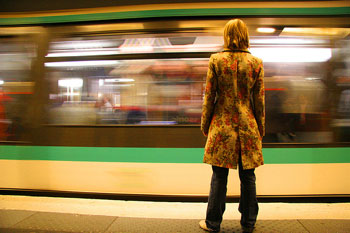
+ Si queremos crear efectos de movimiento en nuestra fotos, usaremos velocidades de disparo más lentas. En mi opinión el límite sería donde nuestro sujeto aparece completamente desenfocado y la foto no resulta cómoda de mirar. Podemos crear efectos tan interesantes como los siguientes ejemplos:

http://www.picturecorrect.com/
http://digital-photography-school.com/

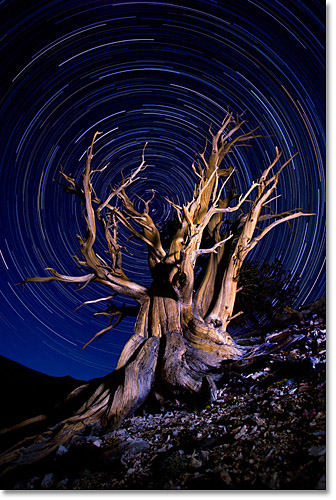
+ O si ya poseemos un trípode que mantenga la cámara estable, podemos programar velocidades de obturación muy lentas que fotografíen todo el halo de movimiento del agua, de unos fuegos artificiales, las luces de los coches y incluso las estrellas. 

http://edknepleyphoto.com/

http://creativefan.com/

http://stephaniee117.blogspot.de/

Y eso es todo sobre la Velocidad de Obturación. ¡¡Nos veremos en la próxima puesta en práctica!!

Basic Concepts 2: Shutter Speed

Second entry about the most important basic ideas to start in photography:

1. Diaphragm Aperture.
2. Shutter Speed.
3. ISO.
4.Exposure/Overposure/Under exposure.
5. Focal Distance.


2. SHUTTER SPEED.

The shutter speed is the time we leave the sensor exposed to the light. It could be said that, It's the time it takes the shoot. Have not you configured sometime your compact camera to take a night picture and you've noticed it took more time than usual? That is because, night pictures -with poor light- the shutter speed increase and could take the picture even for several seconds (And you probably got it moved)


- It is measured in fractions of seconds (1/1000) or seconds (3"). In that way, if we want to catch something in motion, we should shoot quicker to avoid that the subject appears moved. The typical picture of a friend jumping. Did you take it moved? You should decrease the shutter speed to take the picture quicker. In this example, we pass from 1/30 seconds to 1/320.

https://open.abc.net.au/

- It affects mainly to the time which the light reach the sensor, what has influence on:
  • Picture exposure, photo could be catched lighter or darker. If light condition are very good,  and we make the shoot very long, sensor will receive too much light and picture will be too light. 

http://www.shortcourses.com/
  • Movement effect in the picture. If we want to get a frozen picture, without movement, we'll use quick shoots. However, if we would like to add dynamism or movement, we should play with slower shutter speeds. 

http://andreachavarriadotcom.wordpress.com/


Now let's see some examples:

http://www.hiboox.es/

http://www.luchotv.com/

http://www.digitalcameraworld.com/

Water is a element very used to understand how Shutter Speed works. We can decide from to freeze the water drops, to add some movement or to manipulate the water fall in to a silk effect.

Silk Effect is gotten decreasing the shutter speed, in that way, we catch the water movement in the picture -opposite to freeze it-. Silk effect examples:

http://rincondelfotografo.blogspot.de/


Recommendations for the shutter speed use:

+ If we are taking a picture of a moving subject, a football player, a cyclist, a vehicle, an animal, a jump, etc... We should play with faster shutter speed what allows us to focus and/or freeze our subject or object. 

http://petapixel.com/

+ If we want to create movement effect in our pictures, we use slower shutter speed. In my opinion the limit should be where our subject/object is completely out-of-focus and picture is uncomfortable to look at. We can create pictures as interesting as these examples:

http://www.picturecorrect.com/
http://digital-photography-school.com/

+ Or If we already have a tripod to hold the camera stable, we can program very slow shutter speeds (even minutes or hours) what will be able to catch the whole halo movement of fireworks, car lights or even the stars.

http://edknepleyphoto.com/

http://creativefan.com/

http://stephaniee117.blogspot.de/

And that's all about Shutter Speed, See you in next practice!

jueves, 11 de septiembre de 2014

Practica 1: Practicando con .... "La Apertura del Diafragma"

¡¡Hola!! Bienvenidos al primer post de ejercicio práctico.
Hoy voy a poner a prueba la teoría aprendida en el anterior post, "La Apertura del diafragma".

Recuerda:
- La apertura de diafragma afecta a: la Cantidad de Luz que pasa al sensor y a la Profundidad de campo.
- Valor f. mas pequeños (Profundidad de campo menor) indican una apertura mayor, centramos la nitidez en nuestro sujeto u objeto.
- Valor f. más grandes (Profundidad de campo mayor) son aperturas menores, conseguimo más nitidez en conjunto.

Voy a trabajar en un modo Semi-automático, concretamente en el modo "A", que me permite elegir la Apertura del Diafragma a mi gusto y, las otras opciones, son automáticas.


El resto de las funciones que voy a utilizar para esta prueba son:
Velocidad de Obturación: Automática. (Dejémos que por ahora decida la cámara)
- ISO: 100. (Es la mísima)
Balance de Blancos: Nublado.
Distancia focal: 18mm
Objeto enfocado pricipal: Pulpo morado.
*No te vuelvas loco con lo que no entiendas, veremos todas estas características en próximas entradas.

Mi cámara alcanza, con el objetivo actual en 18mm (distancia mínima que alcanzo), aperturas de diafragma comprendidas f.3,5 a f22, así que sin más dilación....  ¡¡Veamos los resultados!!


CONCLUSIÓN: Con un simple vistazo podemos observar, como con una apertura máxima f3.5, el fondo nos queda desenfocado y, con una apertura mínima f22, toda la fotografía nos quedó perfectamente nítida.

Esto es lo que llamamos Profundidad de Campocon valores f pequeños, conseguimos una Profundidad de Campo reducida, y solo lo que quieras enfocar estaré definido. Si quieres mayor profundidad de campo para ser capaz de enforcar todo, necesitarás valores de f. mayores.

http://www.thewebfoto.com/


Vamos a analizar un poco más alguno de los ejemplos,


DIAFRAGMA f 3.5


Trabajando con la apertura máxima f3.5 que me permite mi cámara, podemos ver como nuestros "sujetos" están enfocados, pero nuestro fondo pierde nitidez, dejando todo el protagonismo a nuestros adorables pulpos. Veamos algunas curiosidades con más detalle:


 Detalle 1
El punto principal de nuestro sujeto (Su cabeza), está completamente enfocado, pero objetos por delante o por detrás de el, pierden nitidez progresivamente. Veamos por ejemplo, el pulpo rojo, que esta justo al lado del punto principal de enfoque (el pulpo morado):


Detalle 2
Si os fijáis en las hebras del pulpo morado, se ve perfectamente nítido, en cambio, las patas del pulpo rojo que sobresalen hacia delante, e incluso su cabeza, ya han perdido enfoque.

CONCLUSIÓN
+ Evitaremos usar este tipo de apertura para fotos en grupo o fotos de pareja, ya que, por muy cerca que parezcan estar, podemos sufrir falta de nitidez en todo aquello que no sea nuestro sujeto.
+ Recomendado para hacer fotos detalle, retratos unipersonales o macro, este tipo de apertura ofrece toda la nitidez y protagonismo a nuestro sujeto.


 DIAGRAMA f10


En este caso, hemos cerrado nuestro diafragma hasta f.10 y, aunque seguimos manteniendo el fondo algo desenfocado, nuestros dos sujetos ya aparecen completamente nítidos, tal y como podemos ver en las fotos detalle:

Detalle 3

Detalle 4


DIAGRAMA f22


Y por último veremos el caso de apertura mínima, f22. Donde TODA la foto está nítida, desde nuestro sujeto principal, hasta cada detalle del fondo. (Si no aparece completamente nítido, es debido a que no usé tripode. Y ustedes direis ¿Y eso qué tiene que ver ahora? Lo veremos con mas detalles en otras entradas pero, como idea básica deciros que, cuando cerramos al máximo nuestro diafragma, dejamos pasar menos luz, así que para compensar la falta de luz, debemos tener Velocidades de Obturación más lentas (la foto tarda más en tomarse) , así que podemos perder nitidez por el temblor de nuestra mano)


CONCLUSIÓN
Recomendado para hacer fotos de paisajes o fondos donde queramos captar cada detalle, los diafragma de apertura mínima nos permitirán mantener la nitidez en toda la foto.

-------------------------

¡¡Y esta ha sido la primera práctica!!, espero que haya sido clara y útil. Nos vemos!! :)


Practice 1: Practising with ... "The Diaphragm Aperture"

Hii!! Welcome to the first entry about practical exercise.
Today I´m going to put in to the practise the theory learned in last entry, "Diaphragm Aperture"

Remember:
- The Diaphragm Aperture affects to: Amount of light effects to the sensor and the Depth of Field.
- f. values smaller (Depth of field smaller) indicates a bigger aperture, we focus the definition in our subject.
- f. values bigger (Depth of field bigger) are smaller apertures, we get better definition in the whole picture.

I am going to work in a semi automatic mode, concretely in "A" mode, which allows me to choose the Diaphragm Aperture that I wish and the other options are automatic.


The rest of functions that I´m going to use for this test are:
Shutter Speed: Automatic (Let the camera decides for now)
- ISO: 100 (it's the minimun)
White balance: Cloudy
Foca Distance: 18mm
Main focused object: Purple octopus.
*Do not get crazy with what you don´t understand, we'll see all these characteristics in next entries.


My camera can reach, with the current 18mm lens (It's the minimum distance I get), Diaphragm aperture between f3.5 and f22, so without any further delay ... Let's see the results!


CONCLUSION: With a quick look we can notice, as with the highest Diaphragm Aperture, f3.5, background is out-of-focus and, with the smallest apertures f22, the full picture are perfectly defined.

That is we call Depth field, with littles f values, you get a small Depth field, and only what you focus it'll be defined. If you want a bigger Depth Field to be able to focus everything, you need bigger f values.

http://www.thewebfoto.com/

Let's analyze a little bit more some examples,


DIAFRAGMA f 3.5


Working with the highest aperture -f3.5- which my camera allows me, we can see how our "subjects" are focussed, but our background lose sharpness, leaving the prominence to our adorable octopus. Let's see some details closer:

 Detalle 1
The main point of our subject (its head) is completely focused, but objects in front of or behind it, losing sharpness progressively. Let's see for example, the red octopus, which is just next to our main point of focus:

Detalle 2
If you pay attention to purple octopus threads, it looks perfectly focused but, in the other had, the red octopus legs which protrude forward, also its head, have lost sharpness.

CONCLUSION:
+ We'd avoid to use this kind of aperture for group pictures or couple pictures, because, no matter how close they looks like, we can suffer lack of sharpness where is not our main subject.
+ Very recommended for detail pictures, portrait or macro pictures. This aperture give to you the full sharpness and prominence to our subject.


 DIAGRAMA f10


In this case, We've closed our diaphragm to f10 y, although we keep having the background slightly blurred, our subjects are completely defined, as we can see in the detail picture:

Detalle 3

Detalle 4


DIAGRAMA f22


And finally let's see last case with the minimum aperture, f22, where the whole picture are focussed and defined, from our main character until every background detail. (If it does not look completely focussed is due to I didn't use a tripod, and you can ask: "Why this now?" We'll see it with more details in next entries but, as basic idea I can tell you that when we close our diaphragm, we let pass less light, so to compensate the lack of light, we should use slower shutter speeds (Picture is taken in a longer time), so you can lose sharpness for the shaking of your hand)


CONCLUSION:
+ Recommended for landscape picture or background where we want to catch every detail, with the smaller aperture we can keep the sharpness in the whole picture.
-------------------------

And that was the first practise!! I hope that It has been clear and useful. See you!! :)