Hii!! Welcome to the first entry about practical exercise.
Today I´m going to put in to the practise the theory learned in last entry, "Diaphragm Aperture"
Remember:
- The Diaphragm Aperture affects to: Amount of light effects to the sensor and the Depth of Field.
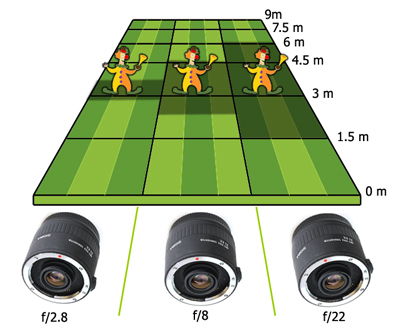
- f. values smaller (Depth of field smaller) indicates a bigger aperture, we focus the definition in our subject.
- f. values bigger (Depth of field bigger) are smaller apertures, we get better definition in the whole picture.
I am going to work in a semi automatic mode, concretely in "A" mode, which allows me to choose the Diaphragm Aperture that I wish and the other options are automatic.

The rest of functions that I´m going to use for this test are:
- Shutter Speed: Automatic (Let the camera decides for now)
- ISO: 100 (it's the minimun)
- White balance: Cloudy
- Foca Distance: 18mm
Main focused object: Purple octopus.
*Do not get crazy with what you don´t understand, we'll see all these characteristics in next entries.
My camera can reach, with the current 18mm lens (It's the minimum distance I get), Diaphragm aperture between f3.5 and f22, so without any further delay ... Let's see the results!

CONCLUSION: With a quick look we can notice, as with the highest Diaphragm Aperture, f3.5, background is out-of-focus and, with the smallest apertures f22, the full picture are perfectly defined.
That is we call Depth field, with littles f values, you get a small Depth field, and only what you focus it'll be defined. If you want a bigger Depth Field to be able to focus everything, you need bigger f values.
 |
| http://www.thewebfoto.com/ |
Let's analyze a little bit more some examples,
DIAFRAGMA f 3.5

Working with the highest aperture -f3.5- which my camera allows me, we can see how our "subjects" are focussed, but our background lose sharpness, leaving the prominence to our adorable octopus. Let's see some details closer:
 | |||
| Detalle 1 |
 |
| Detalle 2 |
If you pay attention to purple octopus threads, it looks perfectly focused but, in the other had, the red octopus legs which protrude forward, also its head, have lost sharpness.
CONCLUSION:
+ We'd avoid to use this kind of aperture for group pictures or couple pictures, because, no matter how close they looks like, we can suffer lack of sharpness where is not our main subject.+ Very recommended for detail pictures, portrait or macro pictures. This aperture give to you the full sharpness and prominence to our subject.
DIAGRAMA f10

In this case, We've closed our diaphragm to f10 y, although we keep having the background slightly blurred, our subjects are completely defined, as we can see in the detail picture:
 |
| Detalle 3 |
 | |
| Detalle 4 |
DIAGRAMA f22

And finally let's see last case with the minimum aperture, f22, where the whole picture are focussed and defined, from our main character until every background detail. (If it does not look completely focussed is due to I didn't use a tripod, and you can ask: "Why this now?" We'll see it with more details in next entries but, as basic idea I can tell you that when we close our diaphragm, we let pass less light, so to compensate the lack of light, we should use slower shutter speeds (Picture is taken in a longer time), so you can lose sharpness for the shaking of your hand)

CONCLUSION:
+ Recommended for landscape picture or background where we want to catch every detail, with the smaller aperture we can keep the sharpness in the whole picture.
+ Recommended for landscape picture or background where we want to catch every detail, with the smaller aperture we can keep the sharpness in the whole picture.
-------------------------
And that was the first practise!! I hope that It has been clear and useful. See you!! :)
No hay comentarios:
Publicar un comentario